The Missing Detective Cipher Wheel: How to Decode the Briefcase Word
Decode the Caesar cipher at the locked briefcase in The Missing Detective: align the Season Cipher Wheel to your hint, shift each letter back, and open the Letter Lock.
Quick answer
Find the coded word near the locked briefcase, read the alignment hint engraved on the Season Cipher Wheel (for example A = D or A = F), shift every encrypted letter that many positions backward through the alphabet, then enter the decoded word into the briefcase's Letter Lock. The briefcase holds the final numeric code for the escape lock.
- The Season Cipher Wheel comes from the safe you open mid-run — collect it before you reach the briefcase.
- Your encrypted word and the alignment hint differ every session; the backward-shift solving method does not.
- After the briefcase opens, check the number inside your own briefcase — do not copy a code from a guide.
The locked briefcase at the end of The Missing Detective is a Caesar cipher puzzle, and it is one of the last locks between you and escaping the room. The full run up to this point is covered in the Missing Detective walkthrough; this page focuses on decoding the wheel and getting the briefcase open.
Before the briefcase: make sure you have the wheel
The Season Cipher Wheel is not something you find at the briefcase itself. It is one of two important items inside the safe you open mid-run — the other is a book containing information about different cases — and both items are needed for the upcoming puzzles. If you are standing at the locked briefcase without the wheel, backtrack to the safe and collect it first. The combination for that safe is covered separately on the Missing Detective safe code page.
After you open the escape route, you will find the locked briefcase. To unlock it, you need to solve a Caesar cipher puzzle, and the wheel is what makes that possible.
How the cipher puzzle works
Three pieces of information combine to produce your password:
- The coded word — an encrypted word is placed near the briefcase. One session showed it as a red-note code reading
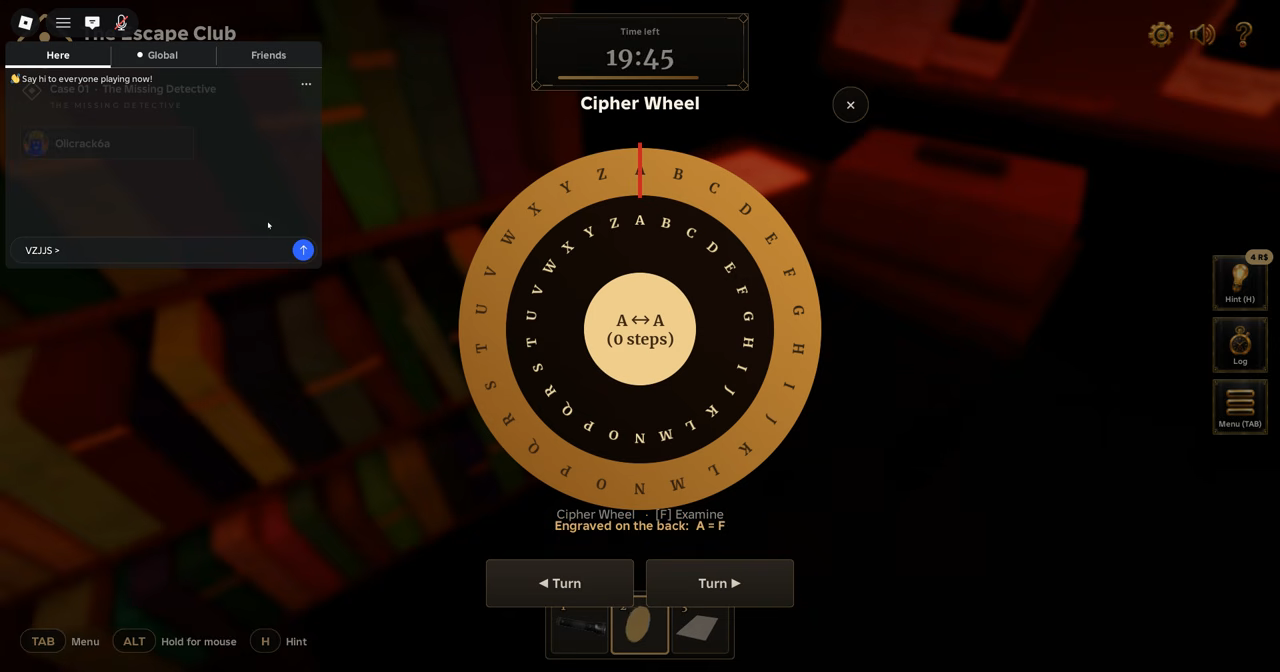
V Z J J S, signed "- J.". - The alignment hint — the hint provided with the cipher wheel tells you how to align it. In one session the hint was A = D, meaning you move three letters backward in the alphabet to decode the message. In another observed run, the Cipher Wheel UI itself displayed "Engraved on the back: A = F", a five-letter alignment.
- The decoded word — shifting each encrypted letter back by the hinted amount gives the password you enter into the briefcase.
The key thing to understand is that the encrypted word and the hint vary between sessions, but the solving method stays exactly the same. That is why you should not copy a decoded word from a walkthrough — your session's answer will almost certainly be different.
Decoding your word, letter by letter
Take the alignment hint and count backward through the alphabet for each encrypted letter, one letter at a time. With the A = D hint (three letters back), the encrypted word IODBH decodes like this:
| Encrypted letter | Move 3 letters back | Correct letter |
|---|---|---|
| I | I → H → G → F | F |
| O | O → N → M → L | L |
| D | D → C → B → A | A |
| B | B → A → Z → Y | Y |
| H | H → G → F → E | E |
That gives the password FLAME for that particular session. This was that game's word — your own encrypted word and hint will likely differ, so decode your letters with your own alignment rather than reusing FLAME.
Both observed runs follow the same pattern — the hint sets how many letters back to shift — and the solving method remains the same even though your session's code and hint will differ. In the observed run with the A = F hint, five steps backward turned the red-note code VZJJS into QUEEN — the player's chat showed "VZJJS > QUEEN" once the wheel was set correctly. V→Q, Z→U, J→E, J→E, S→N: every letter moved five positions back, matching the five-letter alignment the hint engraved on the wheel.
The two observed sessions side by side show what changes between runs and what does not:
| Alignment hint | Encrypted word | Shift | Decoded word |
|---|---|---|---|
| A = D | IODBH | 3 letters back | FLAME |
| A = F | VZJJS | 5 letters back | QUEEN |
The encrypted word, the hint and the shift are session-specific; the backward-counting method is the same every time.
If wrapping past A is confusing, just keep counting down the alphabet and continue from Z — B three letters back is A, Z, then Y. That is exactly what happens to the B in the IODBH example above.
Setting the wheel and entering the word
Open the Cipher Wheel and align it to the hint. The UI tells you the alignment directly — in the observed run it read "Engraved on the back: A = F", and setting the wheel to A→F produced the decoded result in chat. Once you have your decoded word, enter it into the briefcase's Letter Lock. The lock lets you turn the letters with the arrow keys or the wheel and then press [Open], or you can simply type the letters. In the observed run, QUEEN was dialed into the Letter Lock and the briefcase opened.
If your decoded word does not open the lock, work through the likely causes and their fixes:
Problems and fixes
Your decoded word does not open the Letter Lock
The alignment hint was misread
Suggested responseRe-check the hint and set the Cipher Wheel to it again.
Your decoded word does not open the Letter Lock
Letters were shifted in the wrong direction — the supported method decodes by moving backward through the alphabet, not forward
Suggested responseRedo one letter to confirm your shift count, then re-enter the whole word.
What is inside the briefcase
Once the decoded word is entered, the briefcase opens and contains the final code needed to unlock the escape route. In one session that code was 8245, but the final code is session-specific, so check the number inside your own briefcase. Enter your final code into the escape lock, and once it is entered correctly, the final door opens and you can escape the room.
That completes the cipher wheel's job: collected from the safe, aligned to your session's hint, used to turn a coded word into a password, and traded for the last number you need to escape.
For how this puzzle fits among the other locks in the case — from the UV map to the culprit accusation — see the full walkthrough and the overview of all cases and rooms.