
How to Read the Calendar and Enter the Painting Safe Code in The Missing Detective
The painting safe combination in The Missing Detective comes from the numbers marked on the calendar. Learn how to read your calendar's marked numbers, enter them on the safe dial in order, and what items you get inside the safe.
Quick answer
The painting safe combination in The Missing Detective comes from the numbers marked on the wall calendar in the detective office. Read the three marked numbers on your own calendar in the order they are flagged, then turn the safe dial to each number and press Set — 3 numbers in order.
- The safe hides behind the painting by the fireplace and only appears after you play the record on the gramophone.
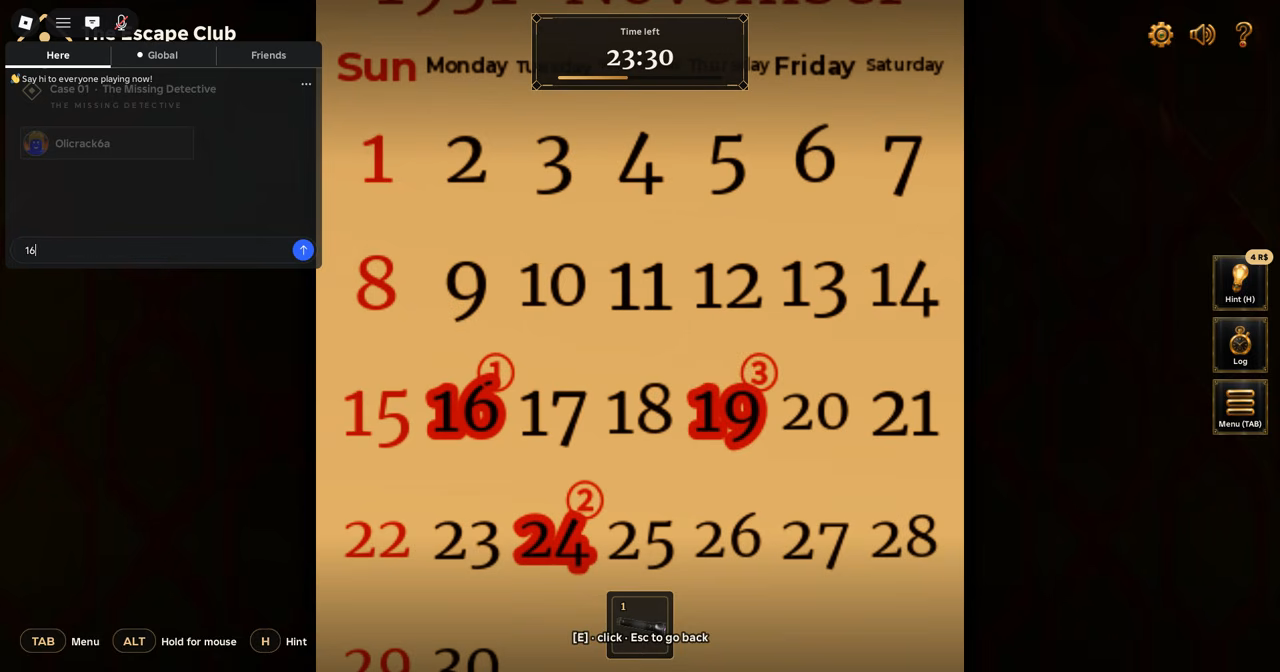
- Two reported runs show the marks differently: small circled 1, 2 and 3 digits beside circled dates in one, red-highlighted numbers in another. Either way, the order is shown alongside the numbers.
- Codes differ between runs: 16, 24, 19 and 19521 are only examples, so always read the numbers on your own calendar.
How the painting safe is revealed
The safe is not visible when you first enter the detective office in The Missing Detective (Case 01). Play the record on the gramophone first: the detective's message plays, and the painting by the fireplace moves aside, revealing the hidden safe behind it.
The safe matters right away. The message tells you that the books on the shelf must be pulled in a particular order to open a secret passage, and to find that correct order you first need to unlock the painting safe. Its combination, in turn, comes from the calendar.
Reading the marked numbers on the calendar
Go to the wall calendar and look for the numbers marked on it — those marked numbers are the safe combination. Two runs of the case show the two ways the clue is presented:
| What you see on the calendar | How the entry order is shown | Example from that run |
|---|---|---|
| A November 1931 calendar between the windows with three circled dates (recorded run) | A small circled digit — 1, 2 and 3 — beside each circled date | 16, 24, 19 |
| Red-highlighted numbers (written walkthrough) | Listed as first, second and third | 19, 5, 21 |
Treat both sets as examples from those players' own games, not a universal code. Your run marks its own three numbers on its own calendar, so read the marked dates on your screen and note both the numbers and the order flags beside them. If a code taken from a video or a friend's game does not open your safe, that is by design — see our guide to why puzzle codes change between runs.
Entering the combination on the safe dial
With the three numbers noted, return to the safe behind the painting. The Safe Dial interface asks for exactly three numbers in order: 'Turn the dial to each number and [Set]. 3 numbers in order.'
- Turn the dial to your first marked number and press Set.
- Turn the dial to your second marked number and press Set.
- Turn the dial to your third marked number and press Set.
In the recorded run, the player dialed 16, pressed Set, dialed 24, pressed Set, dialed 19, pressed Set — and the safe opened. The Set press between numbers is what confirms each entry, so all three numbers must be set in the order your calendar shows.
What you get inside the safe
Opening the safe ends the calendar puzzle and gives you two important items:
- The Season Cipher Wheel.
- A book containing information about different cases — identified as R. Black's Journal in the recorded run.
Collect both before moving on. You will need them for the upcoming puzzles, starting with the bookshelf order puzzle, which draws on the case information recorded in the book — the journal's list of solved cases and their years in the recorded run. The full The Missing Detective walkthrough continues from there, and our Season Cipher Wheel guide covers that item in detail.